February 29, 2016

Makeup Transformation on Joy: Bridal Makeup

Hey guys, so in today's post I'll be talking about my experience with my first bride and some tips I have for bridal makeup. So, I've officially started freelancing now! I'm really excited! I still don't have my website up and running, but it's definitely in the process! Anyways, let's get to my first bridal makeup experience. So, I did Joy's makeup back in October. I actually spent a lot of 2015 practicing makeup. I didn't go to makeup school, which was why I was really hesitant on starting in the beginning. But, there's so much resources these days on the internet! In my opinion, it's not obligated to go to school, but you HAVE to practice a lot! I mean A LOT! That's why I was doing these shoots with my friends. I was working on different skin tones and textures. It didn't only help me practice and learn, but I was also creating content for my portfolio. Even when I knew my friends had weddings or big events, I would offer to do their makeup. I spent a lot of time doing that and I wasn't getting paid, but honestly, it helped me so much! I was also doing Tamanna's (Dress Your Face) online classes, which also helped me A LOT! Tamanna is so talented and it was a great experience! She would give you all the tips and tricks! Like, she works hard in the makeup industry and when you see her work, it's mind blowing! So, I enjoyed doing her classes and I recommend that whether you're a professional makeup artist or not, to check it out! I also started this blog way back last March, because makeup is something that I'm passionate about. Half the time I'm writing these posts at 2am, because I have work or school during the day. I keep myself motivated. Why not make a career out of something that you love? I find blogging was a good starting point. I started learning a lot more about makeup products, as well as different techniques. I was doing a lot of research not only to keep up with trends, but to find ways for a flawless application. I find it helped me a lot to become a makeup artist. Like, even when I do makeup on myself, like my makeup game elevated to another level! Like honestly, it's ok if you don't go to school, but be sure to do your research and PRACTICE! So ya, I'm going to list everything step by step. I'll be mentioning which brushes I use as well! All the makeup that I used on Joy are really good recommendations for your kit and bridal makeup in general! It's going to be very detailed, so I do apologize for this post being really long!


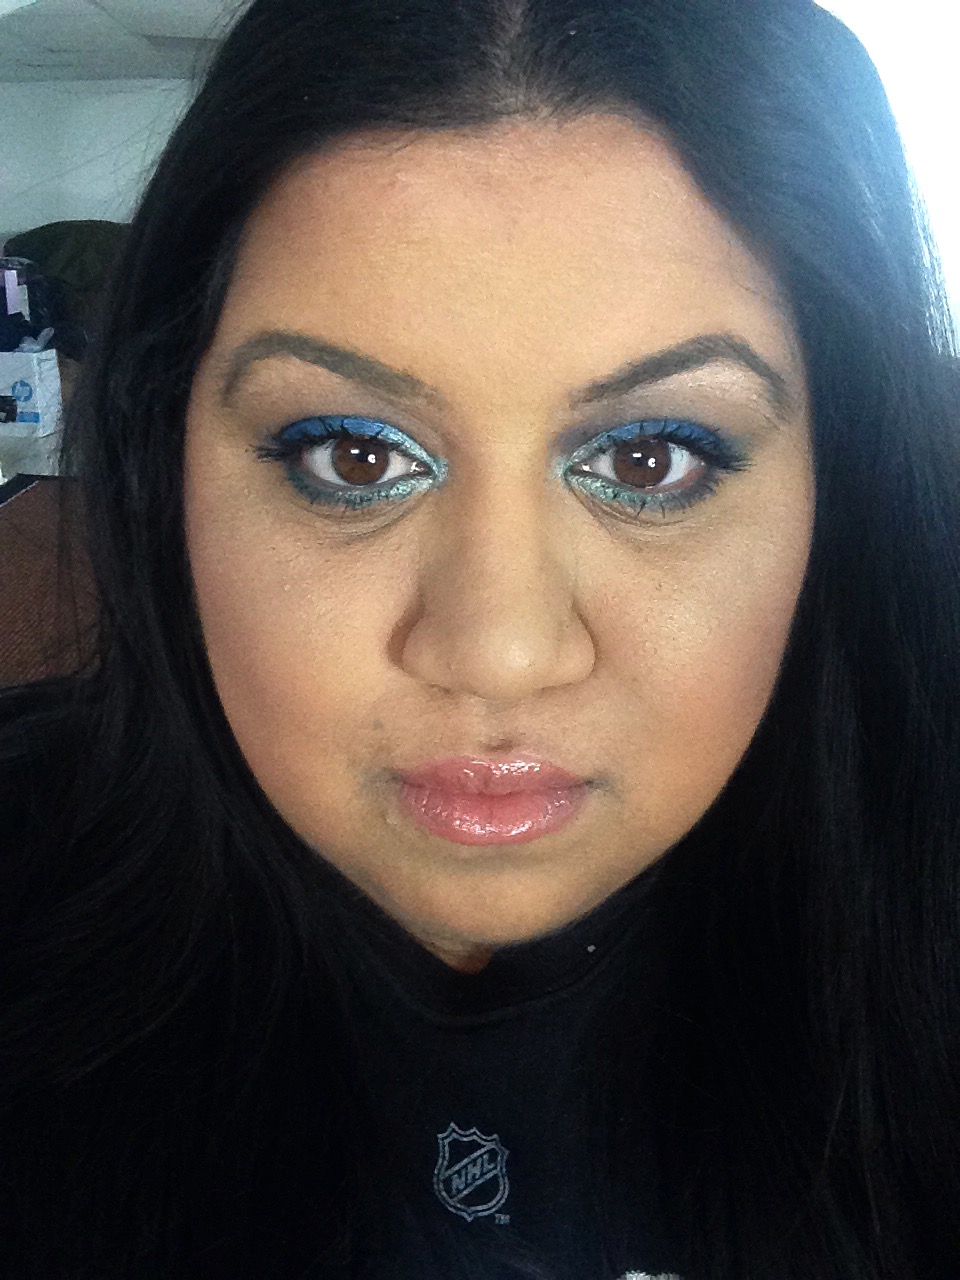
A before and after picture! 


So, I ran a free bridal trial for Joy to basically see what she likes and how she wanted her makeup to be. She wasn't too picky, so it wasn't really stressful. Joy is one of my best friend's sister, so throughout the month, my friend sent me pictures of what kind of look she wanted and what would look nice on her. I find it's a great idea to ask the bride what she wants, that way you're prepared for it and you have an idea of what she expects. Then when it's the trial, you can go over the looks that she picked (they'll always pick more than one look) and you can discuss what will suit her and all. Then, the first question I like to ask is: "What type of skin do you have? Is it oily, dry or combination?". This helps me with my primers and my baking time. I don't want to bake on someone that's dry for too long, because they won't need it and they'll look flaky. Whereas, someone that has oily skin requires more time. After that, you can start the makeup!

Another look at her


1) If they moisturized their face before coming to you, then you don't have to apply a moisturizer. If they didn't then you do! Also, if they came with their makeup done, once you take it off, it's best to moisturize their face! You let the moisturizer sit on their face for a few minutes and then start the makeup application

2) I applied the Dr Brandt Pores No More Pore Refiner Primer first around the whole nose and cheek area (areas with large pores). This primer is amazing for people with large pores. It really fills in the pores and helps the skin look smooth! Then, I applied the Bobbi Brown Hydrating Eye Cream under the eyes to hydrate that area, so that it doesn't get dry and flaky when we bake. Next, I used the Smashbox Photofinish Primer all over her face (besides under her eyes, where we applied the Bobbi Brown cream). The reason I did this is because I want to assure that we have no pores or blemishes peeking through. Since, all cameras will be on Joy, I wanted her skin to look extra flawless! I let the primers sit for a few minutes (3-4 minutes). I even let the Dr Brandt primer sit for 3-4 minutes before I went over with the Smashbox primer! I also applied the Too Faced Shadow Insurance on her lid with my fingers (the best method I find). This primer will help the eye makeup last throughout the day

3)Next, I sprayed Mac Fix Plus all over her skin. I love using Fix Plus to hydrate the skin and it's also going to make the foundation blend a lot better!

4)Since we did a very soft eye on Joy, I went in with the foundation right away. I used the L'Oréal Infallible foundation in the shade Sun Beige. I used the M427 brush by Morphe to apply this foundation in stippling motion. It matched her perfectly and I didn't need to mix shades. I love this foundation. I've never used a foundation that works as well as this one! It has medium coverage, but I definitely built it up. It also looks amazing in photographs and it doesn't leave a cakey feeling on the skin! If you guys are interested, I wrote a full review on this foundation : http://makeupcheckbydivya.blogspot.ca/2015/06/loreal-infallible-pro-matte-foundation.html

5) Next, I used the orange corrector in my Morphe 20CON palette to cover her dark circles.  I used the 130 brush by Mac to apply it and to blend it!

6) Then, I applied the Nars Radiant Creamy concealer in Biscuit. This shade has peachy undertones, so I used it just to assure myself that her dark circles won't peak through! I blended the concealer with the same Mac brush.Then, I went over that concealer with the Maybelline Fit Me concealer in Medium. This shade just helped open up the whole eye area. I also used it on the bridge of her nose and her forehead. Again, I blended everything with the same Mac brush.

7)Next, we started baking! I used my damped Beauty Blender to apply the Laura Mercier Translucent Setting Powder in all the areas that we applied the concealer in. I packed on 3 layers under the eyes and for the rest of her face, I only applied one layer (but a generous amount). I applied quite a bit, since Joy had oily skin and we didn't want her to be a oily mess. I kept the powder on for 8 minutes, which is longer than usual.

8)While the powder was on, I filled in her brows with the Anastasia Beverly Hills Brow Wiz in Ebony. I didn't really create harsh lines, I wanted everything to be as natural as possible. I used the "Feathered" technique. It's basically brushing her eyebrow hair at a upward angle and gently filling them in.

9)Then, I applied MAC Paint Pot in Soft Ochre all over her lid with my fingers. The MAC Paint Pots are a dry base that will prevent your eyeshadows from creasing and fading away! It's definitely a must have for anyone!

10) Time for eyeshadows! So, we went for a really basic look. Joy didn't want anything crazy, so we basically did a nice warm brown crease with shimmer on the lid. I started by applying Free Spirit from Tarte's Tartelette palette all over the eye area. It's best to apply a light neutral shade over the MAC Paint Pot, so that the eyeshadows can blend easily! Then, with my MAC #217 brush, I applied Soft Brown by Mac all over the crease. This is going to be our transition color! Next, I defined the crease with Saddle by MAC. I used my Younique Crease brush to apply this shade. It just darkened the crease up, but be sure that you don't bring it up too much! You just want to focus it right above your lid! Next, I used Dreamer in the Tartelette palette to darken the crease even more. I used the same Younique Crease brush to apply this. I only took a tad bit of this shade, because I don't want it too dark, I just want to define the crease and have that gradient effect going on. Next, I took my Younique Cream Shadow brush and sprayed MAC Fix Plus on it. After, I dipped the brush into MAC's Arena and applied it all over the lid. Arena is a gorgeous peachy gold. It has a satin finish, which was perfect, because Joy didn't want too much shimmer going on! Next, for my brow bone highlight, I used Makeup Geek's Bling. Bling is a frosted ivory shade. It really pops, so it put the whole look together! Next, I took my Morphe Flat Definer Brush (the one that was a part of the Angel Merino collection) and I went under the lash line with Saddle. By this time, I dusted off the Laura Mercier Translucent Powder!


This is the closest picture I got of her eye makeup!


11)Since, it was a soft look, we didn't do a wing. We just applied the Bobbi Brown black gel liner with the Anastasia Beverly Hills #12 brush close to the lash line.

12) Next, I applied Too Faced's Better than Sex Mascara. I love this mascara!  It volumizes and lengthens lashes like no other!

13) Now, it was time for falsies! We stuck with the most natural lashes, because I put longer lashes on her during the trial and she found them uncomfortable. So, we used Au Naturale by House of Lashes. These are super natural and not too long. They're very comfortable and just put the whole look together! I used the Duo Brush on Adhesive as lash glue and I used the Velour Lashes tweezers to help me put them on. I'm not a fan of these tweezers and I don't recommend you buying it! I just didn't have another pair of tweezers on me, so I went with it!

14) Next, I used the Benefit's They're Real mascara on her bottom lashes. The wand of this mascara is amazing to get individual lashes! I also applied this Beige eye liner by Sephora ( I can't find it, so I have no idea what the name is, sorry!) on her water line! I was going to use black, but in case she cried, I didn't want the black to smudge. So, I figured a beige would be perfect to just brighten and open up her eyes!

15)So, I powder contoured and highlighted with the Anastasia Beverly Hills Contour Palette. I used my Real Technique's Contour brush to apply Fawn for contouring. For her forehead, I used the shade Havana, because it's a warm brown that complimented her skin. I find Fawn is just good for your cheek bones, since it has a grey base to it, but when it comes to contouring your forehead, it's best to use a warm shade. It looks more natural and it doesn't look ashy in person! I also used whatever was left on my brush from Havana to go over Fawn slightly. Next, I applied the Banana shade under the eyes, the bridge of her nose and the center of her forehead with the Elf Tapered Highlighter brush.

16)Next, I applied the Nars blush in Deep Throat with the Chanel Blush brush. I love this shade. It's the perfect peachy pink with the right amount of shimmer! It literally suits any skin tone and any event!

17) Next, I took my Morphe M497 (fan brush) to apply Becca's Shimmering Skin Perfector in Champagne Pop as a highlight. I love this highlighter and I've mentioned it a few times, like it's absolutely gorgeous! I was going to use my Hourglass Ambient Lightning Palette, because the highlighters are more subtle and not metallic like the Becca ones. But, her look was already really soft, so I just wanted her highlight to pop!

18) Now onto her lips! I used MAC's Stripdown as a base lip liner. It's a gorgeous nude that's more on the brown side. I find it the perfect nude for people with medium skin, which is why I chose it for Joy.

19) She was looking for a satin or matte finish. So, we didn't bother with a lip gloss. I just applied the Make Up For Ever Rouge Artist Natural lipstick in the shade N4. It's a dusty pink. It's nice and subtle. It just put the whole look together! Since, her makeup was so simple, I wanted to add a bit of color to her lips.

20) Lastly, I sprayed Urban Decay's All Nighter Setting Spray all over her face. This is an amazing setting spray that will legit help your makeup last throughout the day! Even though we set it with powder and all, I just love to use this spray just in case!


She's absolutely gorgeous!


And that's it! Those are all the products that I've used for Joy's wedding makeup!  It was super easy and simple. She looked absolutely gorgeous! It was such a beautiful wedding and I can't wait to work with more brides! I wish I had more pictures and close up of her, but honestly guys, it was such a long day! I was also attending the wedding, so I had to get ready as well and I also had my friends makeup to do! But, if you guys enjoyed this post, I can definitely break everything down again for my next bride this month! If you guys have any questions, please let me know! I'm also taking bookings for the summer, so if you're looking to get your makeup done in Montreal, contact me! Other than that, I hope you have an amazing week! My reviews are slowly coming, so be on the look out for that! I'm also going to be posting this week about how I started freelancing. I been getting a lot of questions about that, so I decided why not talk about it. It'll be useful for those of you that are starting to freelance or are thinking about it!

February 28, 2016

February Haul 2016 (Makeup)

Hey guys! I can't believe February is almost done, like even this month flew by! It's been another busy month for me! If you been reading my blog, then you know I started freelancing and it's actually a lot of work! I haven't had many clients, but I find the whole marketing aspect has been really busy. I'm trying to get my work out there and all, so it required some extra hours. However, I'm really enjoying it! I'm glad that I started and I can't wait for the summer! I've been lacking posts this month too, which I apologize for! However, I wanted this haul to go up before the month ended! I hope you guys like the goodies that I got and if you want me to talk about something on my blog, please message me! I love hearing from you guys! I've been good this month and I haven't spent that much. You'll see that half of the products are for my kit!

February Haul


I forgot to mention this last month, so I'll mention this first. I purchased the Hiker HK3401 Professional Makeup Artist Cosmetics Train Case Organizer Storage with 3 Trays and Dividers in black. I've been on a hunt for a makeup train case for so long and I couldn't find the right one without it being too expensive. So, I decided to check Amazon and they had a lot of train cases! I just wasn't feeling any of them, until I saw this one! This is honestly the perfect train case! It's big and durable! It has a lot of storage! It also wasn't that expensive. I got it for $80CAD with taxes and shipping included! It also comes with keys and a belt. If you guys want me to review this kit, let me know! So far, I'm loving it and I'm so happy that I purchased this!


I love this train case!


I made a quick trip to my local MAC. I needed a few foundation shades for my kit. I picked up the Pro Longwear Foundation in the shade NC50. I believe this is the darkest shade in the Pro Longwear line. I think I only have one dark foundation, so I wanted to expand in that range. I also got the Face and Body Foundation in C7. I really like the wear of this foundation. It's also really nice when it's mixed in with the Pro Longwear. I wanted a shade that was in between medium and tan, but it's slightly darker than what I expected. I'm still going to keep this shade, but I'm going to have to go back and get it in a few shades lighter. I also picked up the Pro Longwear Concealer in NC42. I actually own this concealer in another shade and I really do like it! It doesn't crease as fast as the other concealers do and I love the coverage! It's also long wearing! I picked up this shade, because the MAC employee told me it was a popular shade for Indian people. I also figured since it's a liquid I could use it as a mixer to make the foundation lighter or darker. I'm waiting to get my MAC discount card, so that's why I'm buying a bit at a time.

Just some foundations for my kit!


Next, I placed a order online at Nyx. So, they're Lingerie Liquid Lipsticks came back in stock, so I picked up 4 of the shades! I wanted to get them all, but I already have so many liquid lipsticks, so I had to tame myself. I picked up Honeymoon (cool brown with grey undertones) , Beauty Mark (cool fudge brown), Embellishment (cool mauvey nude) and Teddy (chocolate brown). I reviewed Push Up http://makeupcheckbydivya.blogspot.ca/2016/01/nyx-lingerie-liquid-lipstick-in-push-up.html. Overall, the formula is nice and comfortable. It's pretty long wearing and for the price you can't go wrong! If you guys want swatches, let me know and I can dedicate a post to that! I'm not going to review them individually, since the formula is the same for all the colors, so just check out the review on Push Up! I also got the Concealer Jar in Green. I use green and orange correctors the most, so I wanted to get a full size of these correctors. Unfortunately, the Orange shade was sold out, so I just got the Green one. The green color is to correct blemishes or any redness on your face. I bought it mostly for my kit.

I'm so addicted to Nyx!


Next, I placed 2 orders on Sephora. I got 2 of the Retractable Brow Pencils in the shades Rich Chestnut (chestnut brown) and Midnight Brown (medium cool brown) for my kit. These are a dupe for the Anastasia Brow Wiz!  They have the same results! The only difference is that the ABH Brow Wiz is a bit more creamier than the Sephora ones. These are $16CAD, which is a lot cheaper than the Brow Wiz. I'm officially hooked onto these and I'll definitely be getting one for my personal use. I recommended the Clinique one last year, because it was really nice and it was a  dupe for the ABH Brow Wiz, however the Sephora brand tops that one! Sephora also carries a lot more shades than Clinique!

I love these!


Next, I purchased the Anastasia Liquid Lipstick in Pure Hollywood. This shade was sold out, so when I saw it in stock, I had to get it! Everyone raves about how much of a perfect nude it is, so we'll see. I already own Potion and I really like the formula. It's super pigmented, smooth, long wearing and doesn't dry out your lips! I'm so happy that Sephora sells these liquid lipsticks and I hope all the shades come to Sephora! Next, I purchased the Urban Decay Heavy Metal Glitter Eyeliner in Midnight Cowboy. I been wanting this for the longest time! I was so happy when it came back in stock! It's the perfect gold glitter! I been loving glitter lately, so I'll definitely be getting the other shades soon! Lastly, I purchased the Too Faced Love Flush Blush Wardrobe. This is a blush palette with 6 beautiful shades! I never tried a blush from Too Faced, so I figured why not get this. I have a lot of blushes already, but I just heard so many good things about their blushes, that I caved. I still haven't played with it, but it's at Sephora live, so get it before it sells out (it's limited edition)!


How gorgeous is the Too Faced Blush Palette?!


So, that's all that I purchased. I've been trying to be good. I also got sent a few things that I wanted to share. Born Pretty Store actually sent me face brushes to review. They contacted me in December and so, we started exchanging messages. I'm so thankful for them to reach out to me! I did research on them and wow, they're stuff is super cheap! I saw a bunch of reviews on their stuff and they were all positive. They're a company from Singapore, which is why they're stuff is so inexpensive. Like, this brush set that they sent me retails for $12USD! I mean where else can you get 5 face brushes for that price??!! I'm not going to talk too much about these brushes, but there's going to be a review on them, so stay tuned! So far, they're absolutely gorgeous and I do like them! If you want to purchase from them, use the code DPLH10 to get 10% off!

Yes all these brushes are $12USD! Crazy, right?! So gorgeous!


Next, Influenster sent me the Bioré Vobox for testing purposes! I love Bioré, so when I found out that I was going to get their products, I was super excited! I got both the Baking Soda Pore Cleanser and the Baking Soda Cleansing Scrub. I love products for pores, so I'm so happy to receive these! I'm almost done writing the reviews on these 2 products, so look out for that! It should be uploaded some time this week!

Gotta love Bioré!


That concludes my February Haul! If you guys want me to review anything, please let me know! I know it wasn't that much, but I decided to share it with you guys anyways! It also makes my life a lot easier when I do my yearly favorites! So ya, I hope you guys have an amazing week! I'm looking forward to March and I hope the weather gets better, because I'm so fed up with winter!


February 15, 2016

Fashion Week Makeup Trends 2016

I don't know about you guys, but I just get so excited for fashion week! I'm just so interested to see what the new trends are! Like, if I could, I would have went to New York! Due to school, I had no choice, but to just check out the pictures and videos online. Instagram was flooded with pictures and I just fell in love with so many designers! So ya, I've been legit looking at pictures non stop. I also paid close attention to the makeup and I noticed a lot of interesting trends! Also, Dress Your Face (Tamanna) took over Sephora's Snapchat and went backstage to snap the makeup looks. It was really interesting, so I figured I'd give you guys my thoughts on these new trends! There were a lot of interesting looks! There were some that were simple and there were definitely really exaggerated looks! I'll just be mentioning the few common trends that I noticed and that I been hearing a lot about lately! So ya, I hope you guys enjoy this post!


Some of the products that I used for these looks and products that I recommend!


1) Bold Lips
I'm so happy that bold lips are still trending, because it honestly just puts the whole look together! The common color was red! It's so feminine and beautiful that most models were rocking it! There was barely any eye makeup and just that red lip. Honestly, you can never go wrong with red and it suits everyone! There were a lot of models that were also wearing a vampy lip as well! I LOVE vampy lips. There was both vampy reds and purples that models were wearing! Again, a vampy lip is gorgeous with a minimal eye makeup! It also suits any skin tone!


Jeffree Star's Velour Liquid Lipstick in Redrum. The perfect true red!


2) Feathered brows
I actually been seeing feathered brows quite often lately and definitely a lot of models had that going on. In case you didn't know, feathered eyebrows look more natural. It's the complete opposite to that whole bold eyebrows that was trending before. The key to feathered brows is to brush the hair at an upward angle. I'll be honest, I never liked the crisp cut clean bold eyebrows. They just looked beyond fake and it just draws too much attention to them! The feathered brows definitely doesn't bring too much attention to your brows and it just looks so natural. It's perfect for any makeup look! No need to create harsh lines and a whole new eyebrow for no reason! Just stick to your natural brows and fill them in lightly!


3) A deep crease with a pastel on the lid
Tamanna pointed out that a lot of the looks consisted a deep brown crease with a pastel eyeshadow on the lid. It was definitely a common look. It just creates that soft vintage look. I'm a huge fan of this look and it's so easy! So, if you had trouble with eyeshadows, this look is definitely for you! All you need is a dark matte brown eyeshadow (I recommend Anastasia Beverly Hills eyeshadow in Hot Chocolate) and any light pastel eyeshadow that you desire! You take any blending brush (I recommend the MAC 217) and you blend the dark brown into your crease. Then you take any eyeshadow brush (I love the Younique Cream Shadow brush) and you pat on the pastel shade. Then, take the blending brush with no product and then go over your crease again to blend your eyeshadows, so that there is no harsh lines! Voila, your eye makeup is done! Just pat on some brow bone highlight and you're good to go! This is basically my daily eye look, it's so easy and simple! If you guys want, I highly recommend Tarte's Tartelette! It's a gorgeous eyeshadow palette that has everyday colors!


4) Blue
Speaking of eyeshadows, did you guys see all that blue makeup going on? Blue was definitely the iconic color for the fashion show! So many models were rocking it different ways! For example, Kendall Jenner's makeup was so stunning in the Diane Von Furstenberg show. She just had a gorgeous blue going on the lid with a nice medium green on the lower lash line! It was absolutely stunning! We also saw a lot of models with minimal eyeshadows and that pop of blue on the lash line! In the Phillip Lim show, there was a model that had blue in her inner lash line and then blue on the top outter lash line. It was something very unique that look really nice! We also saw a lot of models with blue all over the crease! The Chanel models even boxed their whole eye area with blue. It was just really nice to see all the different looks! I love the color blue, so it's definitely a color I'll be using a lot!

I love blue eyeshadow! 


5) Metallic Foiled Eyeliner
In Tamanna's snapchat, we saw that in one of her shows, all the models had minimal makeup with a metallic foiled eyeliner going on. I actually loved that look! It's something different, but it's not too much. It just puts the whole look together! We also seen several makeup artists on Youtube and Instagram that been using glitter liners as there eyeliners to create a wing. It's just so nice! I actually purchased the Urban Decay Heavy Metal Glitter Eyeliner in Midnight Cowboy, because I been obsessing over that look! I really wanted to give it a try!


Urban Decay's Heavy Metal Glitter Eyeliner in Midnight Cowboy


6) Glitter
Glitter is definitely in! I'm obsessed with it! There were so many models that just had glitter going on everywhere! There were looks with glitter on the lid, all over the crease and on the lower lash line! I even saw glitter contour, like it was crazy! The whole contour was made with glitter! Lit Cosmetics have amazing glitter, if you guys are on a glitter hunt! Even, Makeup Forever has really nice glitter!


7) Luminous skin
Honestly, who doesn't want luminous skin? It's just so beautiful and you're glowing within! I want to say almost all the models had that dewy finish going on! It just looked so healthy! Since most of the makeup was minimal, it put the whole look together! Liquid illuminators are key to luminous skin! So, if you have a matte foundation that you really like, just purchase a liquid illumintor and mix it in with your foundation! I highly recommend the Gerard Cosmetics illuminator and the one by Inglot! There's also Becca liquid illuminators that I heard really good things about!


That luminous glow! I'm actually using the L'Oréal Cushion foundation in this picture!


8)Strobing with minimal contour
Strobing was huge last year and it's still big this year! Every model had strobing going on! Everyone was beautifully highlighted with minimal contour. I know a lot of people say that strobing took over contouring, which is not true! People still use contouring, just the contours aren't as deep as what they used to be. Most people go light handed with the contour and focus more on the glow now! I slowly started doing that, but I still have my days that I want a deep contour! I've read somewhere that makeup artists were using Vaseline to highlight their top cheek bones to create that glossy highlight on some models. That's really interesting, I would have never thought of that! I know a lot of people are obsessed with layering on highlighters and many people do prefer that wet highlight look. I just never thought of a glossy highlight. It actually looked really good in pictures. Maybe I'll test it out for you guys!


9) Just mascara
A lot of the looks only had mascara on and no eye liner! That means no more struggling with liquid or gel liners! A lot of models also weren't wearing false lashes. I'm guessing the reason behind this is to make the crease pop and keep the makeup as  minimal as possible. I personally don't mind just wearing mascara, but I'm not going to lie, I love a wing and false lashes once in awhile!


10) Mauve is the new nude
I feel like these days everyone is obsessed with mauve and I'm not surprised, because it's a gorgeous color! It suits every skin tone! It's the perfect every day color! A lot of models wore mauve as a nude instead of that true nude. The mauve lip does add a little something to the look, since a lot of the makeup was simple. Tamanna said on snapchat that a lot of artists were using Natural Mauve lip liner by Lancome. They just applied that lip liner as a lipstick and that's it. I actually own this lip liner and since it's so creamy and long lasting, that's all you need!


That's about it for this post! These were the common trends that I noticed. We already saw some of this in the previous years, but it's nice to see it trending again this year! I find this year it's really about soft faces. A lot of models had minimal makeup going on! I was always a fan of that no makeup look, so it's definitely nice to see it trending. But ya, I loved fashion week and I loved the makeup! It honestly gets me so inspired to be different  and try out new things! So ya, let me know what you guys thought about the fashion week makeup! What are trends that you noticed that you liked or didn't like?

February 13, 2016

L'Oréal: True Match Lumi Cushion Foundation Review

L'Oréal released a new foundation this year that really caught my eye! If you been following my blog, then you know that I've been obsessed with the L'Oréal Infallible foundation! It's hands down my favorite foundation! I've also tried the original True Match and the True Match Lumi foundations, which I also really liked, so there's no surprise that I was going to give this one a go! The True Match Lumi Cushion foundation is something that's different. Recently, the whole cushion foundations have been trending in the makeup world! It's basically a foundation in a sponge (cushion) that comes in a compact. It was a Korean brand that started it and then Lancome released a cushion foundation. Now, a lot more brands this year are coming out with it, so it's definitely a popular trend! It's my first time trying a cushion foundation! I was a little hesitant about it at first, but now I find it's a pretty cool concept! So ya, let's get into the review!

LOréal True Match Lumi Cushion Foundation


Starting off with the packaging, it comes in this white compact with a rose gold lid. The compact is also nice and sturdy! It's very travel friendly! You can easily pop this in your purse! When you open the lid, you have a mirror and a sponge. I don't like the sponge at all. I don't think it's the right tool to apply this foundation! You flip the lid and that's where the cushion is! They basically put the foundation in the cushion, so you take your beauty blender or brush and just swirl it in there! It's very important that the lid is shut tightly or else your foundation will dry up! It comes with 14.6g of product. The downfall of these cushion foundations is that they're not sanitary. It's not a liquid that you can dump on your hand or brush. You're literally digging into the cushion every time, which isn't very sanitary. I highly recommend that no one uses these in their freelance kits! You can purchase the L'Oréal cushion foundation at any drugstore or stores that sell L'Oréal products! I got mine at Pharmaprix and Walmart. Let me explain to you why I have two foundations!

I'm loving the rose gold packaging!


When you open the compact


Behind the white shield, you have the cushion

I'm going to tell you guys straight up that I don't like the shade range at all! They don't have a lot of shades! On top of it, both Pharmaprix and Walmart didn't have testers, so I had to guess on the shade! I was comparing the names and numbers with the other L'Oréal foundations. It was legit such a struggle! The sticker on the compact is supposed to correspond to the foundation shade, meaning it's supposed to show you how light or dark it is. I find it didn't help at all. The sticker looks a lot darker than the foundation itself! At Pharmaprix, I picked up N5.5, which seemed like a perfect neutral shade for someone with medium-tan skin. But, it was just way too light! This shade is for someone that's between light to medium skin! N5.5 was the darkest shade in the neutral undertones, so it's really weird. Also, at Pharmaprix this foundation was $25CAD! When I went to Walmart, it was only $20CAD! That's why I decided to purchase W5.5, because it was cheaper and I really liked the results of this foundation, so I was going to give it another go! Luckily, W5.5 matches me really well! It's just a tiny bit darker. This was the darkest shade in the warm undertones! So with that being said, if you're someone that's darker than my skin, then they don't have your shade! My skin falls between medium to tan, so ya, the shade selection is not the best! If you have light skin or you fall in between light and medium, then they have plenty of shades for you! I really do hope that they add on more shades in the future, because this is a nice foundation!


The shade W5.5


So, let's talk about the foundation itself. This is a luminous foundation, so it'll give you a nice dewy finish. It has sheer coverage. You can definitely build it up as you desire, but if you have a lot of breakouts, then this may not be your best option. Since it's sheer, everything will show! So, it's best to use a ton of primers and correctors before applying this foundation! If you're used to full coverage, this will be a huge change, so just keep that in mind! If you have fine lines under your eyes, be sure to layer on the primer twice or else, it's going to peek through! I used the Smashbox Photo Finish Primer, which did the job and I didn't have to worry about my fine lines! I also baked that whole eye area to avoid creasing under my eye! I personally really like the results of it. Since it's winter, I do have more breakouts than usual, but I see myself using this daily during the summer! It's absolutely stunning! It's honestly your skin, but better! It has such a natural luminous glow that I really like! I also like the texture of this foundation. It blends really nicely and it feels super light on the skin! It's pretty long wearing. I find by the 7th hour, I do get oily in my t zone area. It started to slip and slide! So, it's important to set your oily areas or else, you'll just look like a oily mess!


My shade

This is what the foundation looks like on. It's nice and luminous!


Overall, I really like this foundation! It's the perfect sheer foundation. I know I'll get great use out of it in the summertime! Other than the shade range, I have nothing bad to say about it! I find L'Oréal does an amazing job with foundations! If you're on a budget and want a drugstore foundation, definitely check out L'Oréal! So ya, let me know your thoughts on this foundation! Also, let me know which foundations you guys recommend! Hope you guys are having a good weekend!